Iron etching
Etch an image with electricity!
Reagents
Safety
- Put on protective gloves and eyewear.
- Conduct the experiment on the safety underlay.
- Observe safety precautions when working with batteries.
- Do not allow chemicals to come into contact with the eyes or mouth.
- Keep young children, animals and those not wearing eye protection away from the experimental area.
- Store this experimental set out of reach of children under 12 years of age.
- Clean all equipment after use.
- Make sure that all containers are fully closed and properly stored after use.
- Ensure that all empty containers are disposed of properly.
- Do not use any equipment which has not been supplied with the set or recommended in the instructions for use.
- Do not replace foodstuffs in original container. Dispose of immediately.
- In case of eye contact: Wash out eye with plenty of water, holding eye open if necessary. Seek immediate medical advice.
- If swallowed: Wash out mouth with water, drink some fresh water. Do not induce vomiting. Seek immediate medical advice.
- In case of inhalation: Remove person to fresh air.
- In case of skin contact and burns: Wash affected area with plenty of water for at least 10 minutes.
- In case of doubt, seek medical advice without delay. Take the chemical and its container with you.
- In case of injury always seek medical advice.
- The incorrect use of chemicals can cause injury and damage to health. Only carry out those experiments which are listed in the instructions.
- This experimental set is for use only by children over 12 years.
- Because children’s abilities vary so much, even within age groups, supervising adults should exercise discretion as to which experiments are suitable and safe for them. The instructions should enable supervisors to assess any experiment to establish its suitability for a particular child.
- The supervising adult should discuss the warnings and safety information with the child or children before commencing the experiments. Particular attention should be paid to the safe handling of acids, alkalis and flammable liquids.
- The area surrounding the experiment should be kept clear of any obstructions and away from the storage of food. It should be well lit and ventilated and close to a water supply. A solid table with a heat resistant top should be provided
- Substances in non-reclosable packaging should be used up (completely) during the course of one experiment, i.e. after opening the package.
FAQ and troubleshooting
This set contains two types of plates: iron and copper. The copper plates have a characteristic orange color. The iron plates are grey.
The shinier the surface, the better. There shouldn't be any streaks, rust, or patches.
Traces of oils from your fingers (even recently washed) can remain on the metal. The reaction will not occur in these areas, and it can spoil the result.
No, you’ll have to polish the plate again. Any glue particles left on the metal can interfere with the experiment.
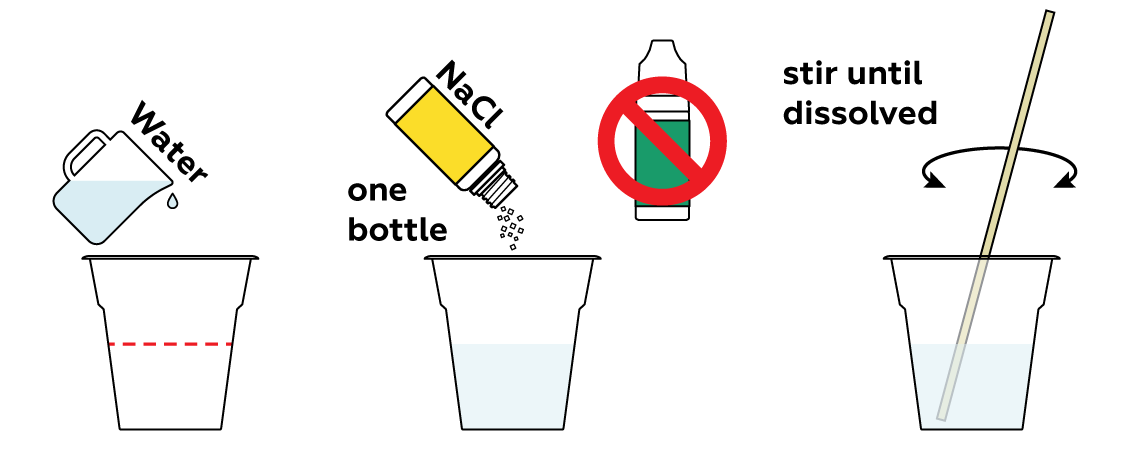
It’s great that you noticed this right away! You’ll need this solution for another experiment, so be sure to save it. Now take the correct bottle of NaCl and prepare a new solution according to the instructions.
This experiment requires a higher voltage and current than old batteries can provide. The surface of the plate may not react fully and may not be as visually appealing if you use old batteries.
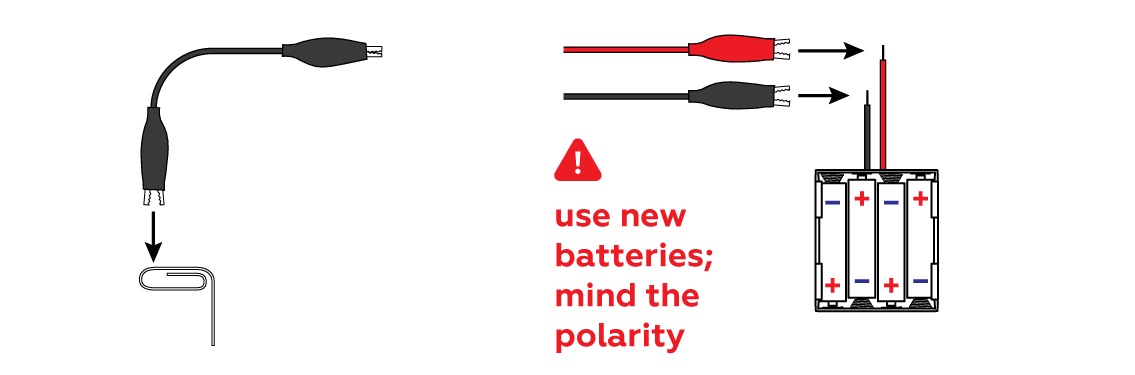
First, make sure you’ve connected the iron plate to the red crocodile clip and the paper clip to the black crocodile clip. Second, check that the red crocodile clip is clamped to the holder’s red wire, and the black crocodile clip is clamped to the holder’s black wire. Make sure that the crocodile clips are clamped to the metal, not the insulation. And finally, try changing the batteries (and be sure to mind the polarity)!
You may have touched the plate with the paper clip. This causes dark spots to appear at the points of contact. If you repeat the experiment, make sure to keep the paper clip above the plate. For now, try rubbing the surface of the plate with the iron wool intended for another experiment – this should help get rid of the stains.
Step-by-step instructions
Clean the surface of the iron so that it can easily engage in chemical reactions.

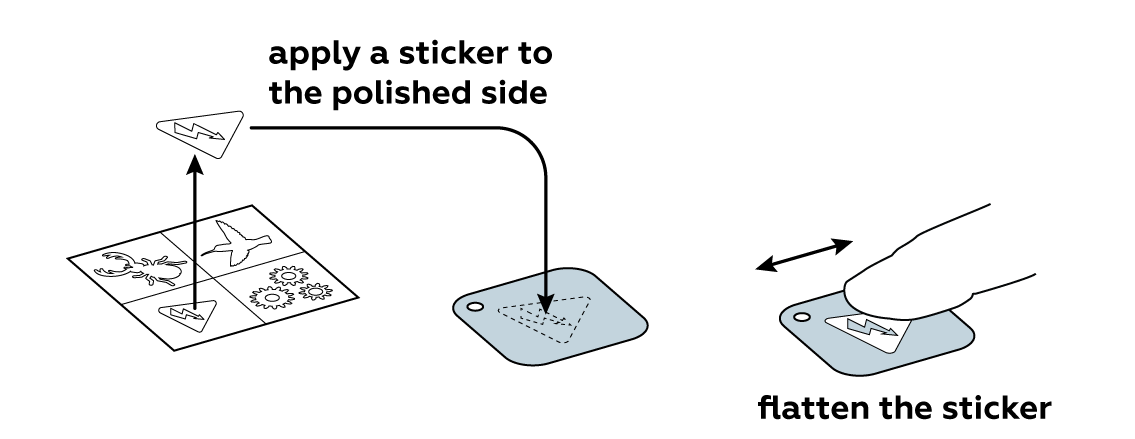
Now protect part of the iron plate with a sticker of your choice.
Prepare a solution of sodium chloride NaCl. This is basically salt water.
Connect the red wire to your iron plate.
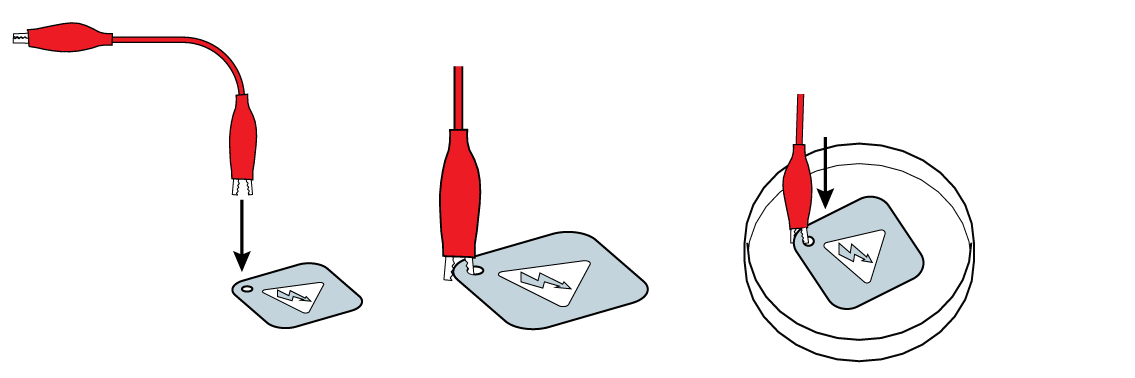
Submerge the plate in your NaCl solution.

Connect the black wire to a paper clip (yet another piece of iron) and connect both wires to your batteries.
Both pieces of iron—the iron plate and the paper clip—are connected to the batteries, but there's an important difference: the "+" wire drains electrons from the piece of iron connected to it, while the "-" wire releases electrons. These processes are only possible when the pieces of iron are in the same solution of a substance known as an "electrolyte." NaCl is one such substance (which makes regular salt water technically an electrolyte solution). In this experiment, when the iron plate loses electrons, the iron atoms with some electrons missing—iron ions Fe2+—escape into the solution, making the iron dissolve.

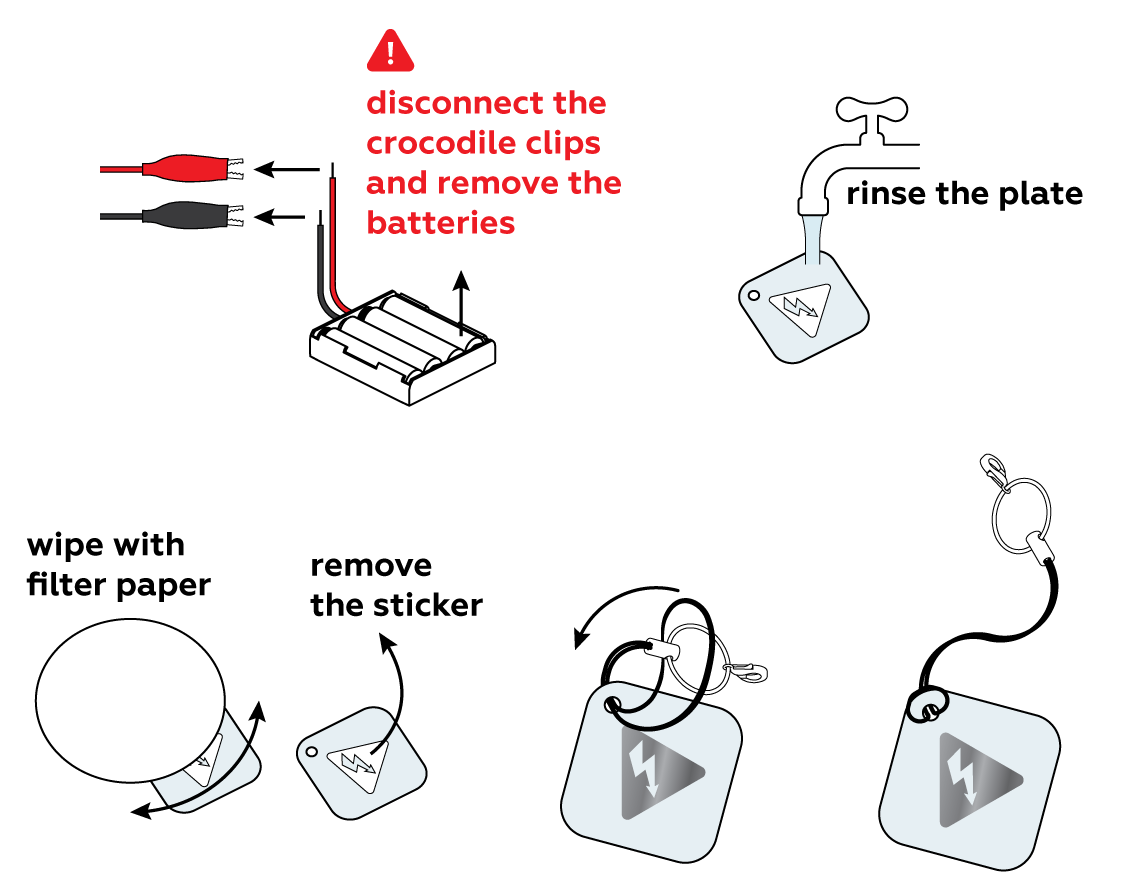
It may look as if not much has happened, but remove the sticker and you’ll easily see and even feel with your fingers how the unprotected surface has changed.
Disposal
Please refer to local regulations when disposing of chemicals. Dispose of other solid waste with household garbage. Pour leftover solutions down the sink. Wash with an excess of water.
That’s interesting!
Etching in industry
The term “metal etching” traditionally encompasses a number of technologies used to remove the unprotected surface layer of a piece of metal, resulting in a design incised in metal. Etching with acids, salts, and alkalis is also used to remove oxide films, rust, and grime from various products. The latter application is quite useful from an industrial perspective.
Removing the top layer helps expose internal defects and uncovers the macrostructure of a material for examination. By etching with different chemicals, metallurgists can identify various possible problems in metal samples. Etching can reveal tiny cracks, pores, or inclusions in metal, which allows metallurgists to determine why a metal may have failed. Etching also increases a surface’s adhesive properties (i.e. the possibility of traction between said surface and another material). This is done before connecting a metal surface with another workpiece, as well as before applying paint, enamel, and other protective coatings. In the aircraft industry, etching is used to reduce the thickness of aluminum sheets to lessen the weight of the aircraft.
Etching is also utilized to create patterns on metal surfaces. Stunningly complex images are drawn via intricate networks of fine grooves in the metal. As metal processing is extremely refined and accurate, within several microns, it can be used to manufacture parts with complex elements. For instance, this technology is used to process small metal parts, such as the gears of a wristwatch. This method is also widely used to create inscriptions and drawings – relief images are drawn by using a stencil to selectively remove a layer of metal.


