Daniell galvanic cell
Recreate one of the first electrochemical cells!
Reagents
Safety
- Put on protective gloves and eyewear.
- Conduct the experiment on the plastic tray.
- Do not allow chemicals to come into contact with the eyes or mouth.
- Keep young children, animals and those not wearing eye protection away from the experimental area.
- Store this experimental set out of reach of children under 12 years of age.
- Clean all equipment after use.
- Make sure that all containers are fully closed and properly stored after use.
- Ensure that all empty containers are disposed of properly.
- Do not use any equipment which has not been supplied with the set or recommended in the instructions for use.
- Do not replace foodstuffs in original container. Dispose of immediately.
- In case of eye contact: Wash out eye with plenty of water, holding eye open if necessary. Seek immediate medical advice.
- If swallowed: Wash out mouth with water, drink some fresh water. Do not induce vomiting. Seek immediate medical advice.
- In case of inhalation: Remove person to fresh air.
- In case of skin contact and burns: Wash affected area with plenty of water for at least 10 minutes.
- In case of doubt, seek medical advice without delay. Take the chemical and its container with you.
- In case of injury always seek medical advice.
- The incorrect use of chemicals can cause injury and damage to health. Only carry out those experiments which are listed in the instructions.
- This experimental set is for use only by children over 12 years.
- Because children’s abilities vary so much, even within age groups, supervising adults should exercise discretion as to which experiments are suitable and safe for them. The instructions should enable supervisors to assess any experiment to establish its suitability for a particular child.
- The supervising adult should discuss the warnings and safety information with the child or children before commencing the experiments. Particular attention should be paid to the safe handling of acids, alkalis and flammable liquids.
- The area surrounding the experiment should be kept clear of any obstructions and away from the storage of food. It should be well lit and ventilated and close to a water supply. A solid table with a heat resistant top should be provided
- Substances in non-reclosable packaging should be used up (completely) during the course of one experiment, i.e. after opening the package.
FAQ and troubleshooting
First, make sure that the LED is connected correctly: the black crocodile clip should be connected to the short “leg,” and the red clip to the long one.
Don’t let either of the crocodile clips touch the other “leg” – this can cause a short circuit!
Also, check the connections between the crocodile clips, zinc wire, and copper wire.
Make sure that the zinc wire is in the plastic vial of colorless zinc sulfate ZnSO4 solution, and that the copper wire is in the vial of blue copper sulfate CuSO4 solution. The wires must be partially immersed in the corresponding solutions.
The absorbing fabric (a salt bridge) should connect the blue copper sulfate CuSO4 solution and the colorless zinc sulfate ZnSO4 solution. If necessary, apply a few drops of CuSO4 to the absorbing strip.
In adding the NaHSO4 solution, we add H+ ions. These tiny particles are extremely mobile and move easily through the solution. This addition intensifies the electric current, thus increasing the overall electrical conductivity of the solution.
Step-by-step instructions
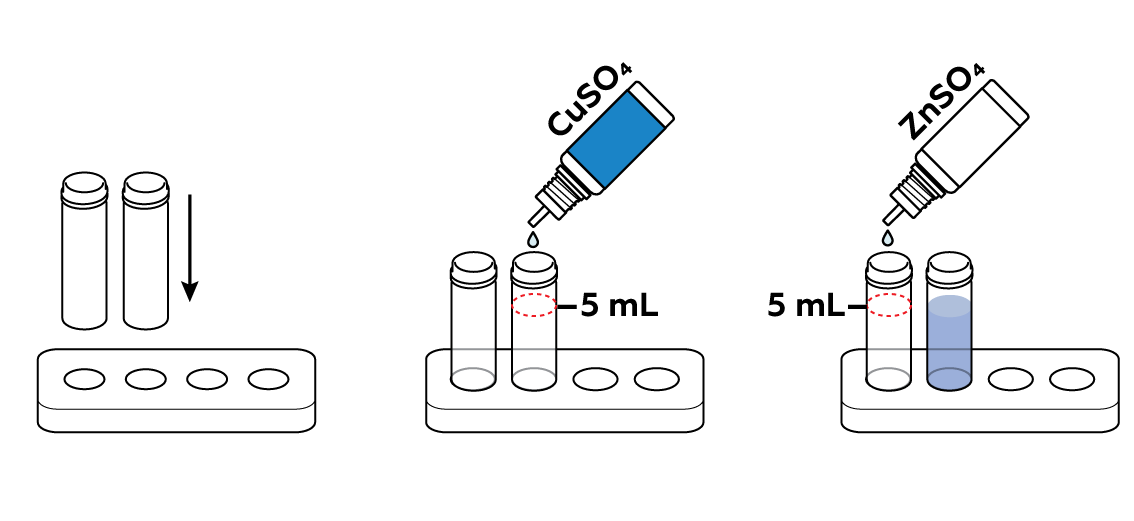
Prepare one vial of copper sulfate CuSO4 solution and one vial of zinc sulfate ZnSO4 solution.
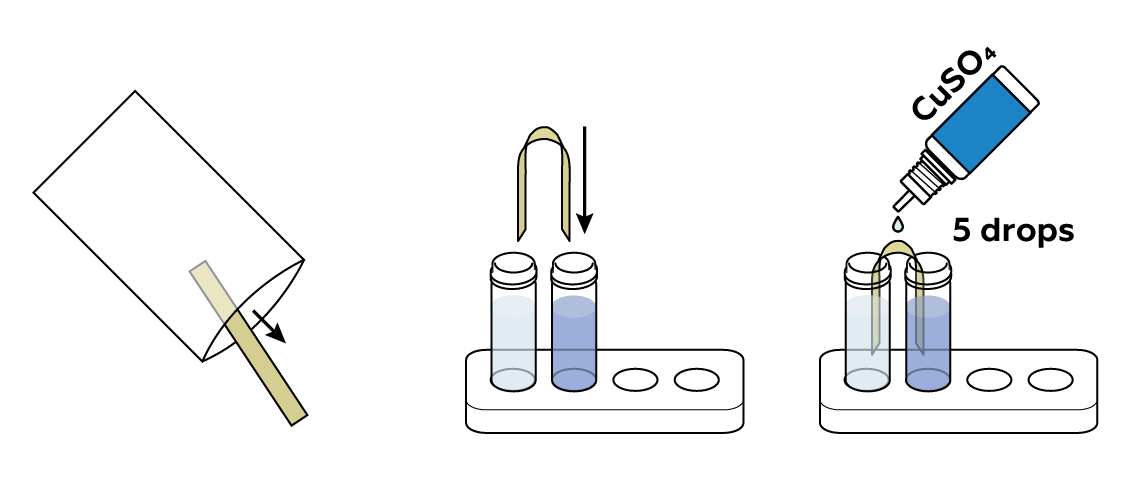
Connect the solutions with a piece of fabric treated with CuSO4 solution.
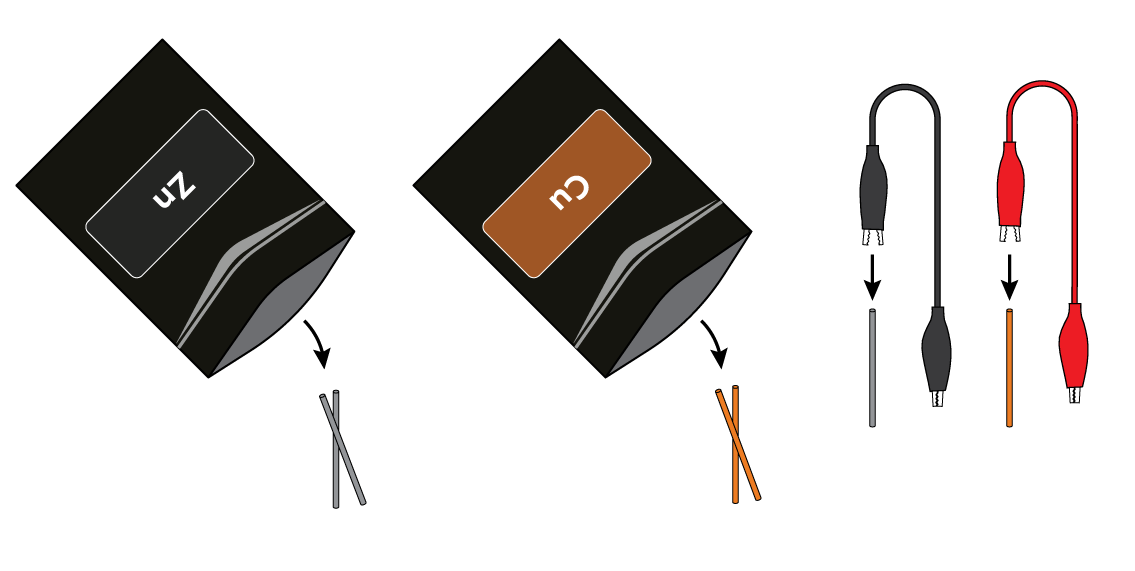
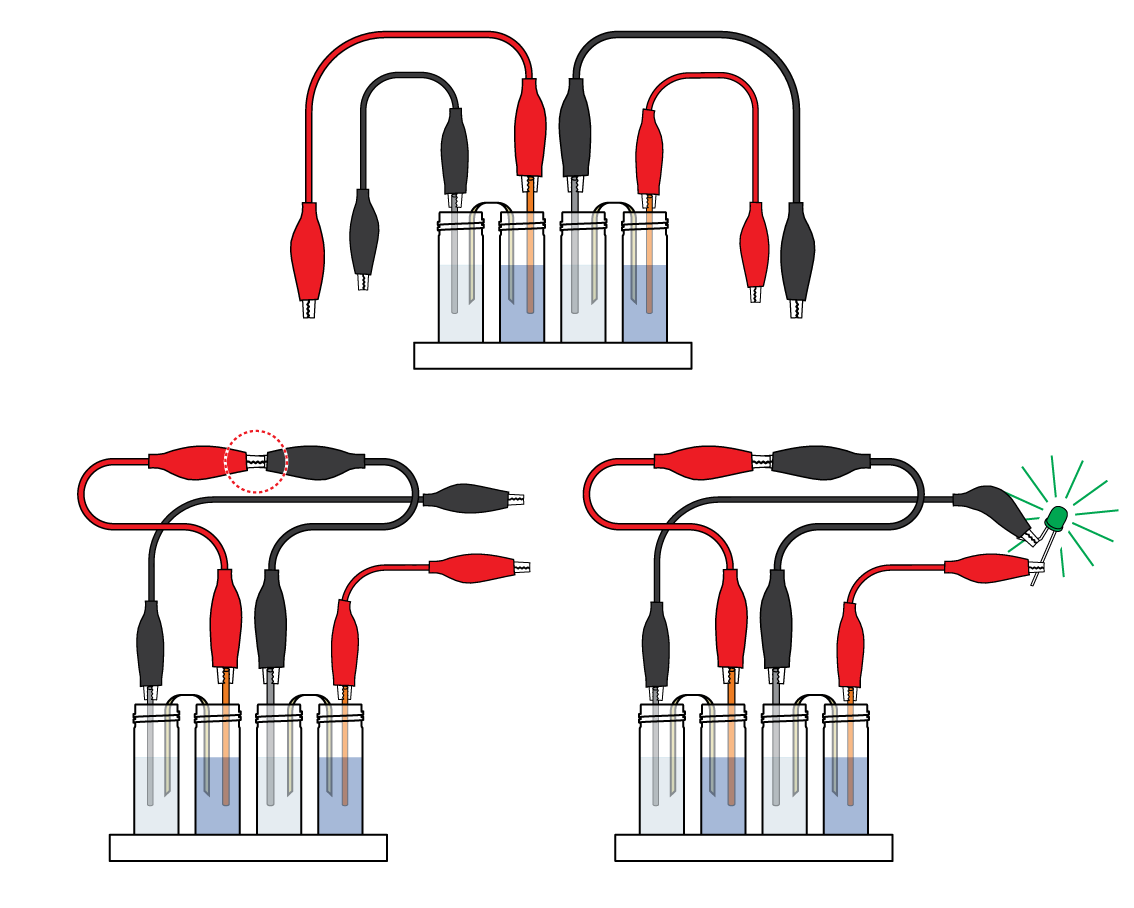
Connect a zinc Zn wire to the black crocodile clip, and a copper Cu wire to the red crocodile clip.
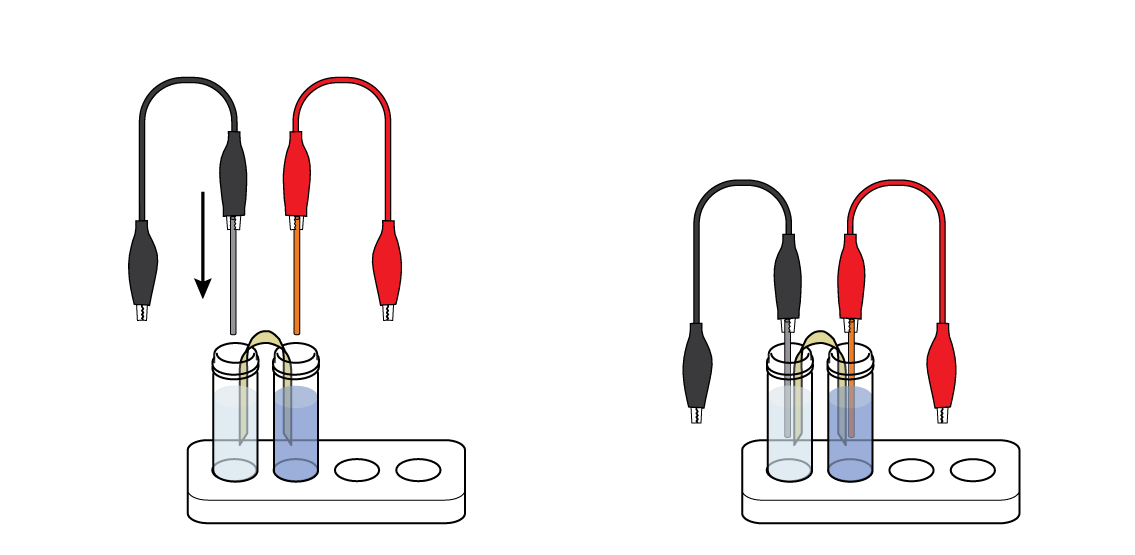
Immerse the metal wires in the vials: put the Zn wire in the vial of ZnSO4 solution and the Cu wire in the vial of CuSO4 solution. Your first Daniell cell is ready!
Oops! For some reason, the LED isn’t lighting up yet. It probably isn’t receiving enough energy. But don't give up—you can double your energy output!

Assemble a second Daniell cell. Connected, the two Daniell cells manage to power the LED!
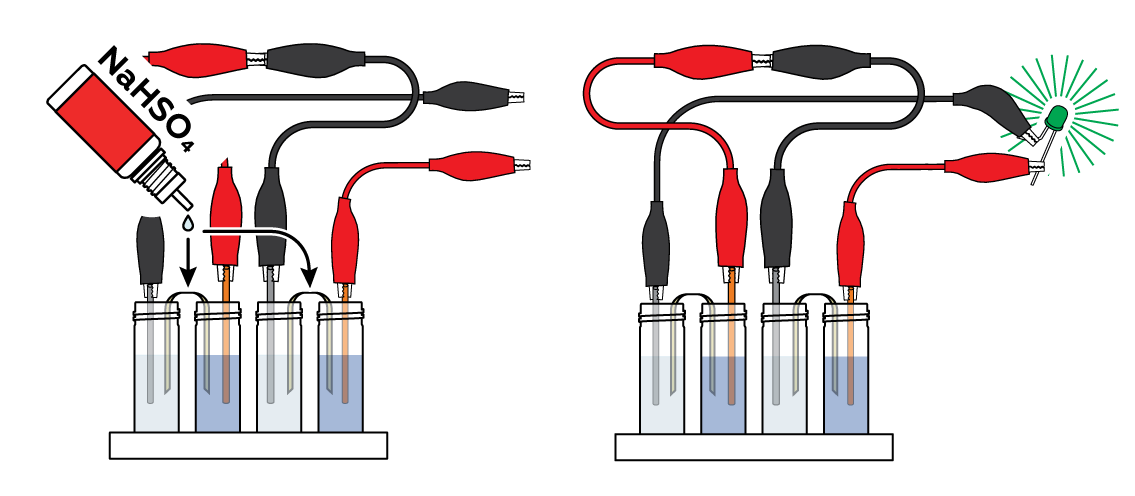
Now apply several drops of NaHSO4 solution to the pieces of fabric. Observe as the LED glows even brighter!
Disposal
Please refer to local regulations when disposing of chemicals. Dispose of other solid waste with household garbage. Pour leftover solutions down the sink. Wash with an excess of water.
Scientific description
![]() The internal workings of the Daniell cell are very similar to those of the lemon battery: the copper Cu
The internal workings of the Daniell cell are very similar to those of the lemon battery: the copper Cu ![]() pulls some electrons
pulls some electrons ![]() from the zinc Zn
from the zinc Zn ![]() through the wire, creating electric current. Meanwhile, zinc particles with some electrons missing (zinc ions Zn2+)
through the wire, creating electric current. Meanwhile, zinc particles with some electrons missing (zinc ions Zn2+) ![]() enter the solution.
enter the solution.
There’s one substantial difference between the lemon battery and the Daniell cell: in the latter, copper ions Cu2+ ![]() , not hydrogen ions, take copper’s spare electrons. This reaction, therefore, doesn’t produce hydrogen gas; instead, copper quietly deposits on the copper wire.
, not hydrogen ions, take copper’s spare electrons. This reaction, therefore, doesn’t produce hydrogen gas; instead, copper quietly deposits on the copper wire.
Two cells must provide twice as much energy as one, right? Well, there are different ways to measure electricity. You can measure electric current, which will double if you connect two cells in parallel ![]() . Current is measured in amperes. Connecting two cells in series
. Current is measured in amperes. Connecting two cells in series ![]() (like you did) will double the electric potential instead. Potential is measured in volts.
(like you did) will double the electric potential instead. Potential is measured in volts.
![]() One cell produces 1.1 volts and about 0.02 amperes, while an LED requires around 2 V and 0.02 A to light up. This is why you need to connect the two cells in series
One cell produces 1.1 volts and about 0.02 amperes, while an LED requires around 2 V and 0.02 A to light up. This is why you need to connect the two cells in series ![]() to power the LED. To charge a smartphone, you’d usually need 5 volts and at least 0.5 amperes. Consequently, you would need 5 cells in series
to power the LED. To charge a smartphone, you’d usually need 5 volts and at least 0.5 amperes. Consequently, you would need 5 cells in series ![]() to produce enough volts, and 25 series connected in parallel
to produce enough volts, and 25 series connected in parallel ![]() to produce enough amperes.
to produce enough amperes.Why does the diode glow?
When a diode glows, it means that there is an electric current in the wires. In our experiment, this electricity is obtained from two galvanic cells known as Daniell cells. Such a cell consists of a solution of zinc salt with a zinc electrode in it, a solution of copper sulfate with a copper electrode in it, and a so-called salt bridge connecting the two solutions. The working principle of this cell is based on the sufficient difference in reactivity between copper and zinc. As zinc is a more active metal, each zinc atom will readily give up two electrons, forming zinc ions Zn2+, which are released into the solution:
Zn – 2e → Zn2+
These electrons migrate to the copper electrode, which develops a negative charge and begins attracting the positively-charged copper ions Cu2+ in the copper sulfate solution. These ions gladly accept the available electrons to form metallic copper, which precipitates on the surface of the copper electrode:
Cu2+ + 2e → Cu0
As they move through the wires from zinc to copper, the electrons create an electric current, which flows through the LED to make it glow.
What is the salt bridge for?
The salt bridge connects the two solutions so that the ions from one solution can move to the other solution, and vice versa. Without such an exchange, the electric circuit couldn’t have formed the loop, and the battery wouldn’t have worked.
If we take a closer look at the cell, we will find that there is an excess of positively-charged ions in the zinc sulfate solution and an excess of negatively-charged particles in the copper sulfate solution. When the salt bridge connects the solutions, the superfluous negatively-charged ions can move from the copper sulfate solution to the zinc sulfate solution, and the positively-charged ions can move in the opposite direction. Thus, the salt bridge completes the electric circuit.
Why do we use two cells in the experiment?
Two cells connected in series provide enough voltage for the LED to glow. One cell has a voltage of approximately 1 V, while two of them yield almost twice as much. The two cells can also be connected in parallel; in this case, the voltage will remain 1 V, but another characteristic – the electric current efficiency, or amperage – will double.
Follow up
What can I do with the NaHSO4?
It’s great that you noticed the extra bottle! That’s the way a real researcher works! Apply several drops of NaHSO4 solution to the fabric and add a little bit to each vial. The LED should glow even brighter! Don’t hesitate to experiment – keep exploring, and you will surely succeed!
That’s interesting!
What was the first chemical source of electric current?
Italian researcher Alessandro Volta (full name Alessandro Giuseppe Antonio Anastasio Gerolamo Umberto Volta) was the first to come up with the idea to connect a copper rod and a zinc rod with a wire and then immerse them in an electrolyte solution. An electrolyte is a compound that, upon dissolving, produces positively- and negatively-charged ions, i.e. in the form of a solution, it conducts electricity.
Moreover, a measure of electric potential difference – the volt – is named after Alessandro Volta. Through his work, Volta proved that such a system made from two rods and an electrolyte indeed produces electricity. Back then, it was a real breakthrough!
Volta also demonstrated that several cells containing a zinc-copper pair can be connected. Thus, he created a “voltaic pile,” which was essentially the very first chemical source of electricity. This discovery greatly expanded the range of voltages researchers were able to work with. The pile consisted of alternated copper and zinc plates, with each pair of plates enclosing a piece of woolen tissue soaked in an electrolyte solution. In the video below, you can see what the construction of the voltaic pile looked like:
Here, an electrolyte can be a solution of a strong acid (HCl, H2SO4), alkali (KOH, NaOH), or salt (NaCl, ZnSO4). In solution, all of these compounds dissociate into charged particles (ions). They serve as charge carriers, helping charges “migrate” from zinc to copper. Simply clumping pieces of zinc and copper together would not work: transitions would only take place at the contact points between the two metals. Such a system is really no different from an ordinary piece of metal.
Interestingly, massive voltaic piles (containing over 2,100 pairs of plates in one device!) possess enough power to create an electric arch – a phenomenon caused by air ionization due to a strong current source. Molecules in the air (mostly N2 and O2) are normally neutral. However, when they bump into conductor ends connected to such a huge voltaic pile, these molecules become ionized – they accept or donate electrons. This process snowballs and creates an entire zone of ionized air – plasma, which conducts electricity.
What is a diode, and how does it work?
A diode is a tiny device that can conduct electricity (in one direction) and sometimes turn this energy into useful work. In our case, we’re dealing with a light-emitting diode (LED): it glows when conducting electrical current.
All modern diodes rely on semiconductors – special materials with poor electroconductivity, which can improve under certain circumstances (such as with the application of heat). Incidentally, what is electrical conductivity? It is a material’s ability to conduct electrical current.
Interestingly, unlike a regular conductor, any diode contains two “types” of semiconductors. Even the word “diode” (from the Greek δίς) indicates that it is comprised of two elements – namely, an anode and a cathode.
A diode’s anode is made of a semiconductor that contains so-called holes: void regions that can be filled with electrons. These holes can be pictured as empty shelves designed specifically for electrons. Moreover, these “shelves” can freely move throughout the anode to a certain degree. A diode’s cathode is also made of a semiconductor. However, this second semiconductor is different: it contains an excess of electrons that, again, can move almost freely throughout the cathode.
Notably, this construction allows electrons to pass freely through a diode in one direction but prohibits their movement in the opposite direction. As electrons move from a cathode toward an anode, the “free” electrons from the cathode meet the electron vacancies (“shelves”) in the anode. There, the electrons gladly occupy these vacancies, allowing the current to move further. You can observe this process in the video below.
Now, let’s imagine that the electrons were inclined to move in the opposite direction. They’d have to leave their cozy shelves and move into the material that has no shelves at all! This is an obvious disadvantage for the electrons, and thus the current doesn’t flow in that direction.
Therefore, any diode can work as a sort of check valve for electricity: current passes through a diode in one direction and cannot pass through in the opposite direction. This unique property makes diodes quite useful in electronics. Any computer, smartphone, laptop, or tablet has a processor containing millions of microscopic diode-like devices called transistors.
Light-emitting diodes, in turn, are utilized in lighting and indicating. The semiconductor components of a diode that produces light are carefully selected. A certain combination of semiconductors creates a system in which the electron transfer from a cathode to the vacancies in an anode is accompanied by the emission of a photon, i.e. a portion of light. Various semiconductors produce differently-colored glows. Diodes offer relative safety and high efficiency, or degree of converting electrical current into light, compared to other electrical light sources.


