Xmas tree
Decorate a Xmas tree using table salt!
Reagents
Safety
- Put on protective gloves and eyewear.
- Conduct the experiment on the plastic tray.
- Observe safety precautions when working with boiling water.
- Do not allow chemicals to come into contact with the eyes or mouth.
- Keep young children, animals and those not wearing eye protection away from the experimental area.
- Store this experimental set out of reach of children under 12 years of age.
- Clean all equipment after use.
- Make sure that all containers are fully closed and properly stored after use.
- Ensure that all empty containers are disposed of properly.
- Do not use any equipment which has not been supplied with the set or recommended in the instructions for use.
- Do not replace foodstuffs in original container. Dispose of immediately.
- In case of eye contact: Wash out eye with plenty of water, holding eye open if necessary. Seek immediate medical advice.
- If swallowed: Wash out mouth with water, drink some fresh water. Do not induce vomiting. Seek immediate medical advice.
- In case of inhalation: Remove person to fresh air.
- In case of skin contact and burns: Wash affected area with plenty of water for at least 10 minutes.
- In case of doubt, seek medical advice without delay. Take the chemical and its container with you.
- In case of injury always seek medical advice.
- The incorrect use of chemicals can cause injury and damage to health. Only carry out those experiments which are listed in the instructions.
- This experimental set is for use only by children over 12 years.
- Because children’s abilities vary so much, even within age groups, supervising adults should exercise discretion as to which experiments are suitable and safe for them. The instructions should enable supervisors to assess any experiment to establish its suitability for a particular child.
- The supervising adult should discuss the warnings and safety information with the child or children before commencing the experiments. Particular attention should be paid to the safe handling of acids, alkalis and flammable liquids.
- The area surrounding the experiment should be kept clear of any obstructions and away from the storage of food. It should be well lit and ventilated and close to a water supply. A solid table with a heat resistant top should be provided
- Substances in non-reclosable packaging should be used up (completely) during the course of one experiment, i.e. after opening the package.
FAQ and troubleshooting
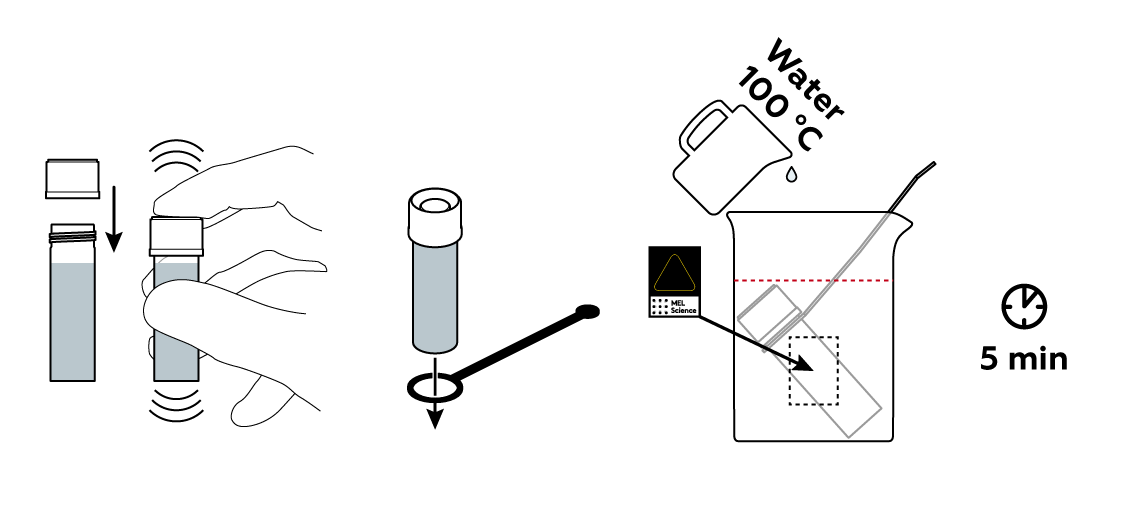
If most of the salt dissolved, you can continue the experiment. There is an excess of sodium chloride NaCl, and a small amount of it will not hinder the experiment. However, if there is more than a 5 mm layer of undissolved salt on the bottom of the vial, there isn’t enough NaCl in the solution to create a fluffy Christmas tree. If this is the case, we recommend heating the vial a little longer.
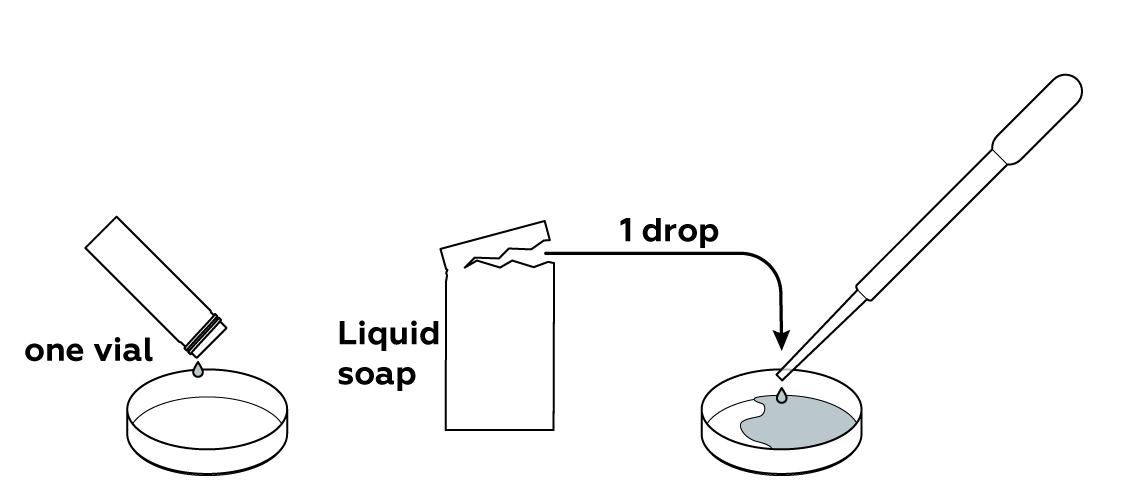
Take the second part of the Petri dish and pour the liquid soap from the packet into it. This will make it easier for you to use the pipette to transfer one drop into the solution.
Your Christmas tree should be kept still because the crystals growing on it are very fragile and can crumble away at the slightest touch.
This can happen if you add too much liquid soap. Try repeating the experiment, being careful to add exactly one drop of liquid soap.
One slight shake – and our Christmas tree sheds its salt “snowdrifts”! Luckily, we can easily recreate its beauty! Carefully wash the “snow” off the tree with the same amount of warm water that you used in the beginning of the experiment, and the “snowdrifts” will regrow in just 12 hours! You can repeat the experiment many times.
The paper you use for this experiment must have a specific consistency. It must be light enough that the salt solution can spread through it uniformly before the fluffy crystals start to form. If this process occurs too slowly or not at all, the salt crystals will start growing right in the Petri dish or only at the base of the paper structure. Meanwhile, it must be thick enough that it can hold its shape when wetted with salt water; paper that is too thin may deform or collapse.
You can easily check for yourself whether a paper is suitable for the experiment. Cut out a small piece of your chosen paper, about 1x5 cm in size, and see if it fits the parameters described above. First, immerse one end of a sample paper in the solution, leaving the other end in the air.
If the paper absorbs the solution too quickly, it will rapidly change shape and collapse. If the paper doesn’t get moistened effectively enough, you’ll know in 12 hours: the “snowdrifts” will form either only on the base of the tree, or not at all.
If neither of these scenarios comes true, and the paper turns out covered with salt formations, you can absolutely use it in the experiment. You can cut out any shapes (snowflakes, for example), and just in 12 hours they’ll be covered with “snow”!
The “snow” in our experiment can be grown on other materials besides paper. For instance, the salt solution would effectively moisten a woolen thread. You can use a metal wire to make a branched “tree,” wrap it in woolen thread, and use this structure instead of a paper tree. Just make sure the thread will absorb the solution well!
No, we don't recommend touching the tree with your bare hands. Besides, keep in mind that this tree is very fragile. Touching it will most likely cause it to shed its crystals!
If you touched the tree with your bare hands, be sure to wash your hands thoroughly!
Step-by-step instructions
Mix some sodium chloride NaCl with a small amount of K4[Fe(CN)6] solution and some water.

Many compounds, including sodium chloride NaCl, dissolve better at high temperatures.
A little bit of soap will help your solution climb your Xmas tree.
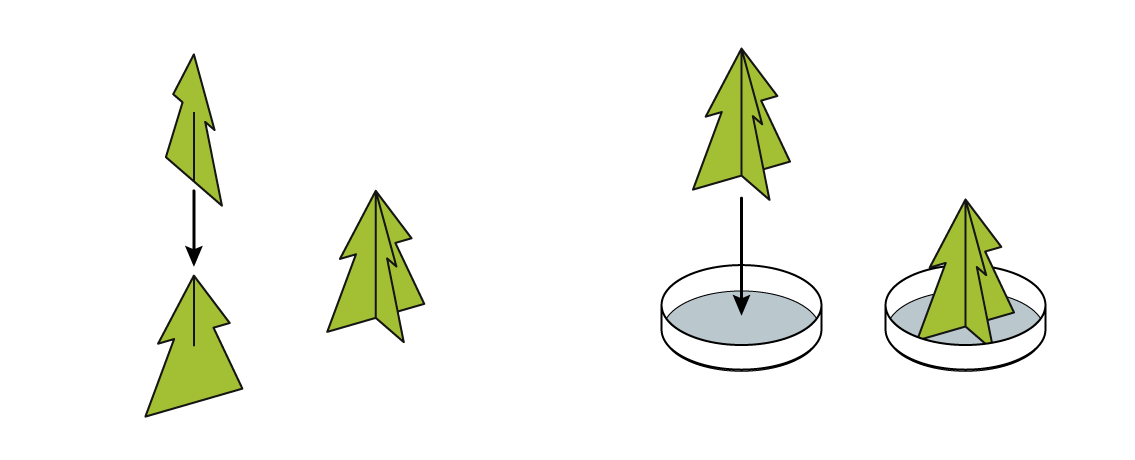
Assemble the tree and put it in the dish.
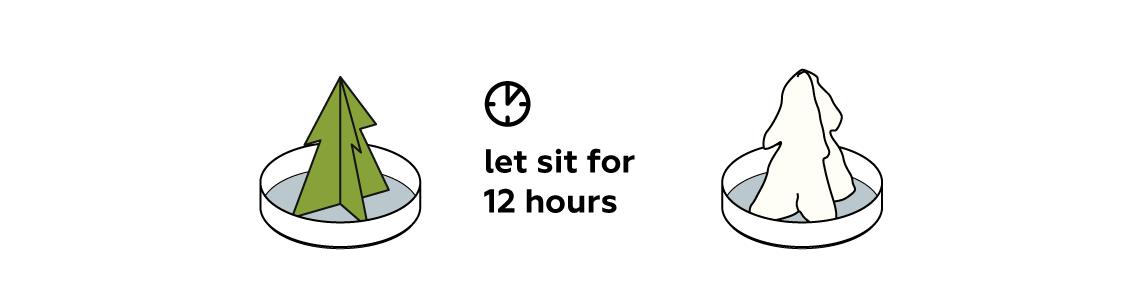
In the upcoming hours, several processes will take place. The capillary effect will draw the liquid up through the paper tree. The liquid will cool down, making some of the salt precipitate to form crystals. The liquid will also slowly evaporate, forcing even more salt to crystallize.
Disposal
Please refer to local regulations when disposing of chemicals. Dispose of other solid waste with household garbage. Pour leftover solutions down the sink. Wash with an excess of water.
Scientific description
 Sodium chloride NaCl crystals are usually simple cubes
  . That's because Na+
  and Cl\-
  particles arrange in an orderly cubic fashion
  . Why do the crystals covering your tree look anything but cubic? You can thank K4[Fe(CN)6]
  for that. This compound can attach to a forming NaCl crystal, slightly disturbing its cubic array. As the crystals grow, these disturbances accumulate, resulting in the fluffy crystals you see.
How does our Xmas tree become covered with snow?
We moisten the “tree” with a heated solution of table salt NaCl in water. The water gradually evaporates from the surface of the tree and from the container, forcing the salt to crystallize. Due to the rapid evaporation and the effects of potassium hexacyanoferrate K4[Fe(CN)6], the salt from the solution develops into fluffy formations that strongly resemble snow.
Why do we add a drop of soap?
Liquid soap is a surfactant: it changes the surface tension of aqueous solutions. In our case, liquid soap decreases the surface tension of the solution, allowing it to spread out evenly in the Petri dish.
That’s interesting!
How is your “snow” different from real snow?
In fact, there are both similarities and differences between real snow and your "snow." First, they both form crystals. But as you may know, every snowflake is unique, with its own special shape. If you try, you can differentiate between them even in a lofty snowbank. But if you look closely at your "snow," you will notice that the crystals are rather shapeless, with no special structure. But they lie on the Christmas tree like real snow! Additionally, snowflakes consist of a large number of water molecules strongly bound to each other. Your "snow" in the snowbank consists of sodium chloride NaCl and potassium hexacyanoferrate(II) K4[Fe(CN)6] crystals, and forms due to the slow evaporation of water.
Further, real snow and your "snow" are both solid. And they both dissolve easily in warm water. But real snow can melt at temperatures above 0oC. Chemical "snow" will delight you at almost any temperature!


