Chlorine
Obtain chlorine and study its chemical properties!
Safety
- Put on protective gloves and eyewear.
- Conduct the experiment on the plastic tray and in a well-ventilated area.
- Keep a bowl of water nearby while working with fire.
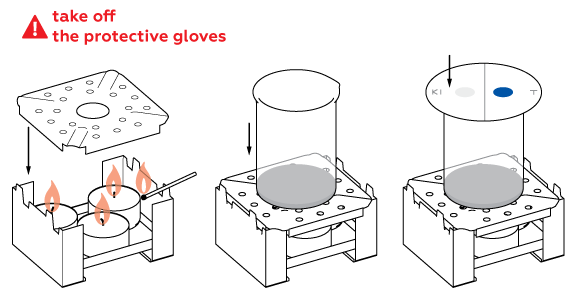
- Remove protective gloves before lighting the candles (step 3).
- Do not allow chemicals to come into contact with the eyes or mouth.
- Keep young children, animals and those not wearing eye protection away from the experimental area.
- Store this experimental set out of reach of children under 12 years of age.
- Clean all equipment after use.
- Make sure that all containers are fully closed and properly stored after use.
- Ensure that all empty containers are disposed of properly.
- Do not use any equipment which has not been supplied with the set or recommended in the instructions for use.
- Do not replace foodstuffs in original container. Dispose of immediately.
- In case of eye contact: Wash out eye with plenty of water, holding eye open if necessary. Seek immediate medical advice.
- If swallowed: Wash out mouth with water, drink some fresh water. Do not induce vomiting. Seek immediate medical advice.
- In case of inhalation: Remove person to fresh air.
- In case of skin contact and burns: Wash affected area with plenty of water for at least 10 minutes.
- In case of doubt, seek medical advice without delay. Take the chemical and its container with you.
- In case of injury always seek medical advice.
- The incorrect use of chemicals can cause injury and damage to health. Only carry out those experiments which are listed in the instructions.
- This experimental set is for use only by children over 12 years.
- Because children’s abilities vary so much, even within age groups, supervising adults should exercise discretion as to which experiments are suitable and safe for them. The instructions should enable supervisors to assess any experiment to establish its suitability for a particular child.
- The supervising adult should discuss the warnings and safety information with the child or children before commencing the experiments. Particular attention should be paid to the safe handling of acids, alkalis and flammable liquids.
- The area surrounding the experiment should be kept clear of any obstructions and away from the storage of food. It should be well lit and ventilated and close to a water supply. A solid table with a heat resistant top should be provided
- Substances in non-reclosable packaging should be used up (completely) during the course of one experiment, i.e. after opening the package.
FAQ and troubleshooting
Sodium bisulfate aggregated into lumps. How do I measure it now?
Break these lumps down with a stirring rod from the set. Keep stirring the salt in the bottle until it becomes homogeneous.
I can smell gas when conducting the experiment. Is it dangerous?
Indeed, a negligible amount of chlorine is produced in this experiment. The amount of gas released is enough to make you feel the smell but too small to cause any harm to health. Nevertheless, avoid bringing the open glass close to your face to sniff it! In order to smell any chemical, the proper technique is to waft: move your hand in a sweeping motion over the container with the chemical. This would be enough to bring the scent toward you.
Drops of potassium iodide and thymol blue accidentally touched each other. Should I continue the experiment?
If the drops do not overlap, you may continue the experiment. If they blended in, however, take a new sheet of filter paper and deposit the drops again.
The stain of released iodine doesn’t want to disappear completely (step 5). What should I do?
Adjust the filter paper to position the stain away from the edge, right above the chlorine vapors. Make sure all three candles are lit up.
Step-by-step instructions
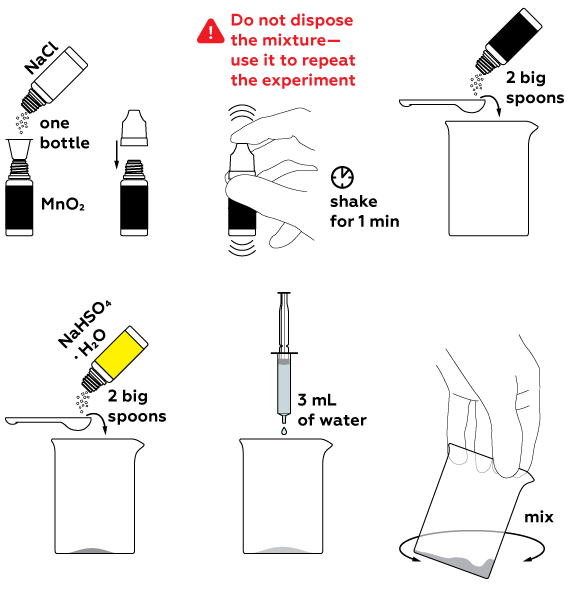
To obtain chlorine Cl2, a number of reagents should be mixed. Firstly, we obtain hydrochloric acid HCl from sodium chloride NaCl with the help of an acidic medium (we create this with the use of NaHSO4). HCl reacts with manganese dioxide MnO2, which yields chlorine Cl2.
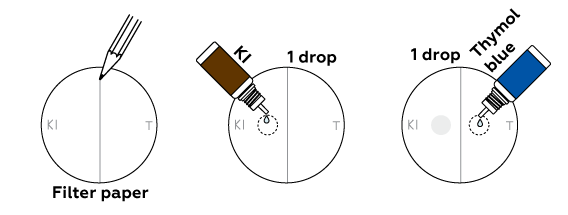
How can we be sure that we obtained chlorine? Let’s try out two qualitative reactions. Chlorine is a gas, so we’ll conduct these in the drops on filter paper, not inside the beaker.
High temperature speeds up the chlorine formation reaction.
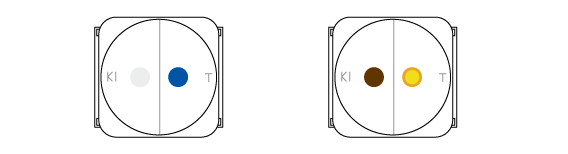
Two processes occur in the drops. In the left one chlorine oxidizes iodine atoms from KI into molecular iodine I2. It has a deep brown color. In the right drop a pH-indicator thymol blue changes its color from blue to orange. This is because the chlorine dissolves in the drop of indicator and forms some acids.
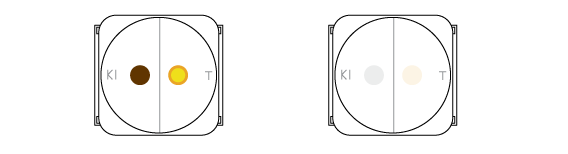
Chlorine can oxidize molecular iodine further. Colorless substances are formed in this process, and the brownish color slowly disappears. Meanwhile chlorine gradually oxidizes the thymol blue which becomes colorless.
To stop the chlorine formation reaction, extinguish the candles and fill the beaker with water. Wash the beaker thoroughly after it cools down.
Expected result
Chlorine changes the color of the indicator thymol blue and oxidizes iodide into elemental iodine.
Disposal
Dispose of solid waste together with household garbage. Pour solutions down the sink. Wash with an excess of water.
Scientific description
How is chlorine produced?
Chlorine Cl2 was first produced as early as the XVIII century by a Swedish chemist – Carl Wilhelm Scheele. Even though the chemist did not realize that he had discovered a new element, the method he used is very similar to the method used in our experiment. The chemical reaction in Scheele’s method is shown in the following chemical equation:
4HCl + MnO2 → MnCl2 + 2H2O + Cl2
When manganese dioxide is added to a solution of hydrochloric acid, half of the chlorine ions oxidize and form elemental chlorine, while the others bond with manganese.
How is the hydrochloric acid produced that is used in this experiment?
In the first step, NaCl (table salt) is mixed with MnO2 (manganese dioxide) and in the second step we add NaHSO4 (sodium hydrogen sulfate) and water. This mixture is then heated. When NaHSO4 (sodium hydrogen sulfate) is dissolved in water, hydrogen ion or proton (H+) is released:
NaHSO4 → Na+ + H+ + SO42–
At the same time, sodium chloride separates into two ions, Na+ and Cl-:
NaCl → Na+ + Cl–
When the chloride and hydrogen ions meet, they bond together and form hydrochloric (HCl) acid:
Cl− + H+ → HCl
In summary, hydrochloric acid forms according to the following reaction:
NaHSO4 + NaCl → Na2SO4 + HCl
Why does the drop of thymol blue solution change from blue to red?
Thymol blue is a pH indicator, which means that it changes color according to the number of protons in a solution. The initial thymol blue solution does not have many protons and the color of the thymol blue indicator remains blue. However, after a while a notable amount of chlorine forms. Some of the chlorine dissolves in the drop of thymol blue solution. When chlorine dissolves in water, two acids are formed:
Cl2 + H2O → HCl + HClO
This causes the number of the protons to increase. When thymol blue is exposed to a high concentration of protons, its color changes from blue to red.
What happens to the solution of potassium iodide?
If you look at a modern periodic table, you will notice there are six halogens: fluorine, chlorine, bromine, iodine, astatine and tennessine. As astatine is extremely rare and tenessine is very radioactive with an extremely short life span, the best studied halogens are fluorine, chlorine, bromine and iodine.
Fluorine is known to be an extremely reactive element, while iodine can be kept in our first aid kit for quite a long time. This shows us that the reactivity of halogens decreases from fluorine to iodine.
Halogens have an interesting chemical property: a more reactive halogen pushes a less reactive one out of its salts. This is exactly what happens in this experiment: chlorine is more reactive than iodine, so it pushes the iodide ion out of potassium iodide to form elemental iodine, which gives the spot on the filter paper its characteristic brown color:
Cl2 + 2KI → I2 + 2KCl
Why do iodine and thymol blue lose their color after some time?
Chlorine is a very reactive element. It can react with iodine to produce a colorless iodic acid:
3Cl2 + I2 + 4H2O → 6HCl + 2HIO4
Chlorine can also oxidize thymol blue. The oxidized form of thymol blue is colorless, and therefore the drop of thymol blue solution gradually loses its color.


