Painting with light
Learn to draw using a diode!
Safety
- Conduct the experiment on the safety underlay.
- Put on protective gloves and eyewear.
- Do not aim the LED at eyes or face.
- Do not allow chemicals to come into contact with the eyes or mouth.
- Keep young children, animals and those not wearing eye protection away from the experimental area.
- Store this experimental set out of reach of children under 12 years of age.
- Clean all equipment after use.
- Make sure that all containers are fully closed and properly stored after use.
- Ensure that all empty containers are disposed of properly.
- Do not use any equipment which has not been supplied with the set or recommended in the instructions for use.
- Do not replace foodstuffs in original container. Dispose of immediately.
- In case of eye contact: Wash out eye with plenty of water, holding eye open if necessary. Seek immediate medical advice.
- If swallowed: Wash out mouth with water, drink some fresh water. Do not induce vomiting. Seek immediate medical advice.
- In case of inhalation: Remove person to fresh air.
- In case of skin contact and burns: Wash affected area with plenty of water for at least 10 minutes.
- In case of doubt, seek medical advice without delay. Take the chemical and its container with you.
- In case of injury always seek medical advice.
- The incorrect use of chemicals can cause injury and damage to health. Only carry out those experiments which are listed in the instructions.
- This experimental set is for use only by children over 12 years.
- Because children’s abilities vary so much, even within age groups, supervising adults should exercise discretion as to which experiments are suitable and safe for them. The instructions should enable supervisors to assess any experiment to establish its suitability for a particular child.
- The supervising adult should discuss the warnings and safety information with the child or children before commencing the experiments. Particular attention should be paid to the safe handling of acids, alkalis and flammable liquids.
- The area surrounding the experiment should be kept clear of any obstructions and away from the storage of food. It should be well lit and ventilated and close to a water supply. A solid table with a heat resistant top should be provided
- Substances in non-reclosable packaging should be used up (completely) during the course of one experiment, i.e. after opening the package.
FAQ and troubleshooting
Well, the answer is usually “yes.” But your results will vary widely!
A red LED actually won’t work at all. A green LED will work poorly, but you’ll be able to see the drawing appear gradually. A blue LED will work nicely. A UV LED will yield the best result of all.
But why do they differ? In brief: the light they emit is a form of energy. The different color of each LED represents a different amount of energy being emitted. As it turns out, the reaction that reveals the drawing requires that a certain amount of energy be transferred to the reagents.
Yes, that's totally normal. The reaction yields carbon dioxide CO2, which you can observe as bubbles.
If the whole mixture has turned blue, this likely means that you’ve overexposed it to light. But don’t worry! Just discard this plastic cup and start over. When repeating the experiment, keep in mind that the experiment must be performed in very dim lighting.
And if the mixture turned greenish? It will still work, but the image won’t be as contrasted.
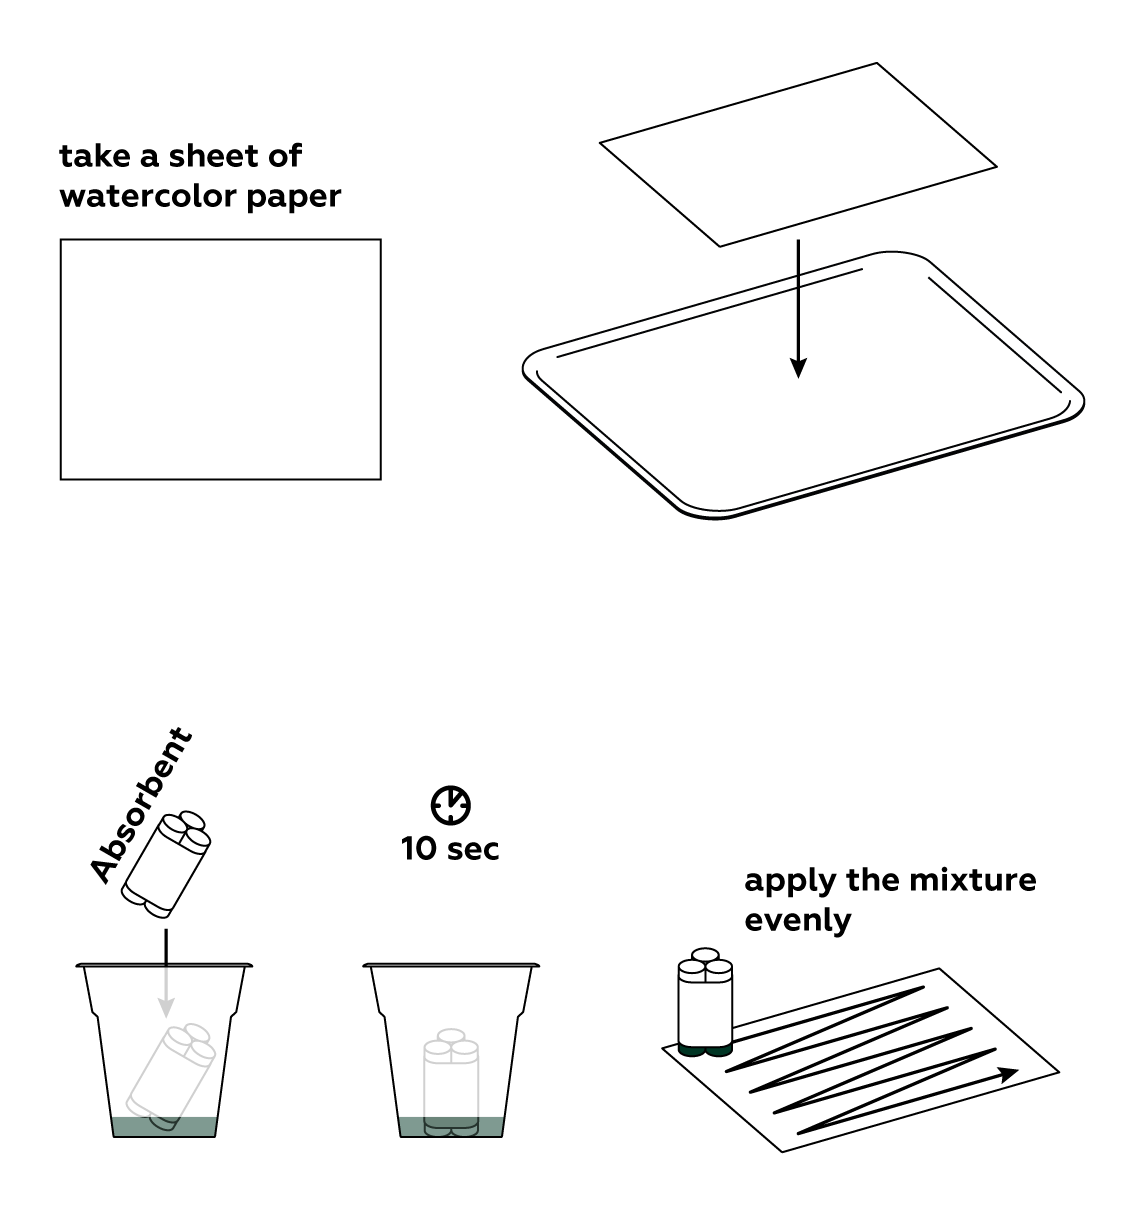
Unfortunately, ordinary paper is rather thin and tears relatively easily. We recommend using the watercolor paper provided in the set. The set contains enough paper to repeat the experiment several times.
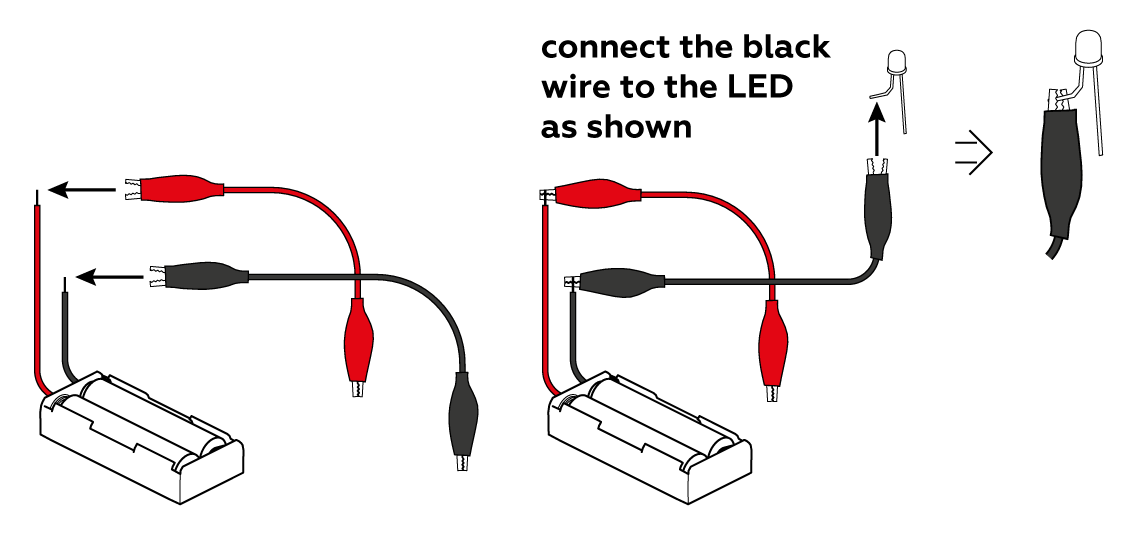
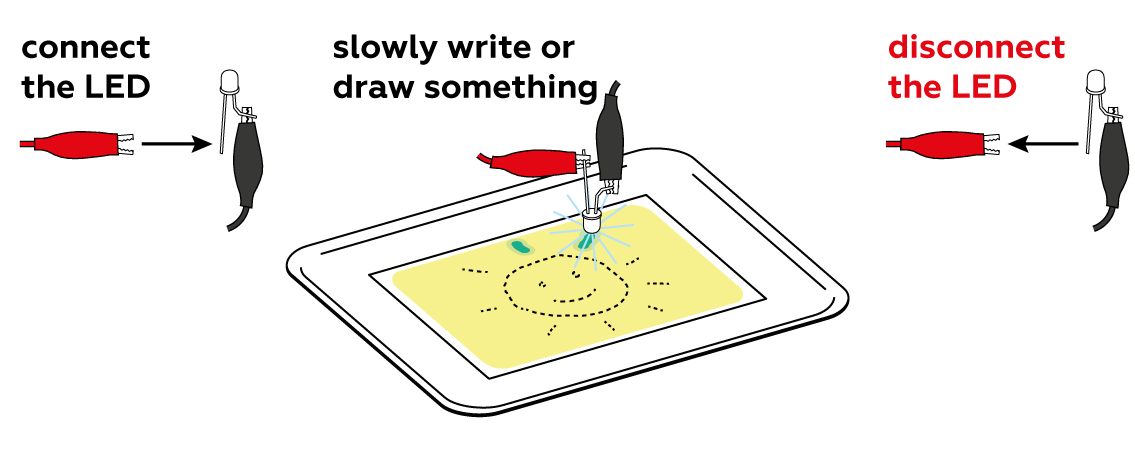
First, make sure that the LED is connected correctly: the black crocodile clip should be connected to the short “leg,” and the red clip to the long one.
Don’t let either of the crocodile clips touch the other “leg” – this can cause a short circuit!
Make sure that the crocodile clips are clamped to the metal, not the insulation. And finally, try changing the batteries (and be sure to mind the polarity)!
You have to move the diode very slowly to give the reaction time to happen. Try drawing more slowly. If that doesn't help, replace the batteries – maybe the LED isn’t shining brightly enough to initiate the reaction. Don't forget to disconnect the LED after use! The batteries heat up quickly.
It seems like your paper was exposed to too much light! This might be due to sunlight, or to using the LED for too long, or because the lights in the room where you performed this experiment are too powerful! Try to reduce any bright lighting and repeat the experiment.
Step-by-step instructions
You will be dealing with light-sensitive reagents, so you'll need to avoid bright light, such as direct sunlight.
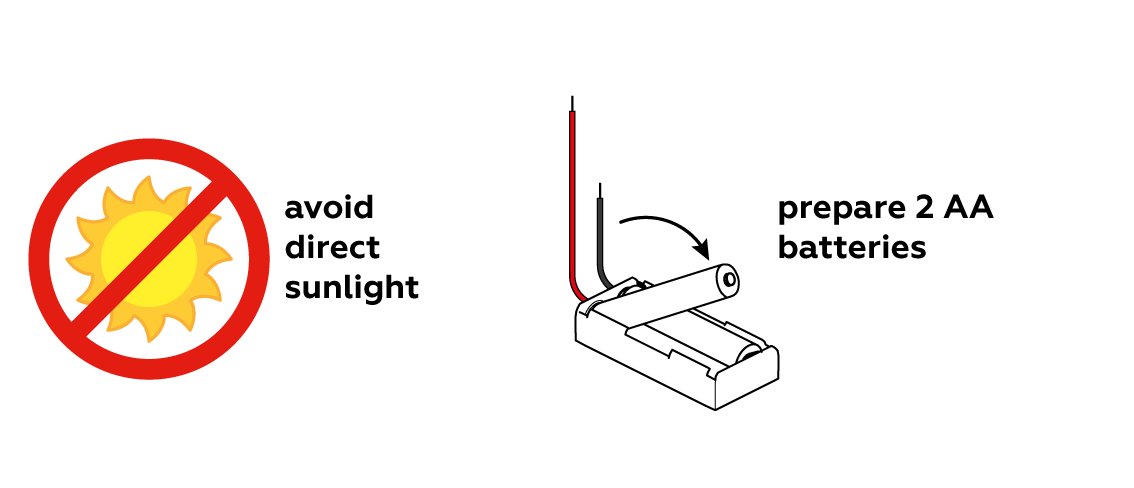
To draw with light, you need, well, a source of light. The LED from the set will work just fine.
The second ingredient for your light-drawing is a light-sensitive compound. Ammonium iron(III) citrate is one such compound. To~prepare it, mix ammonium iron(III) sulfate, citric acid, and ammonium carbonate.
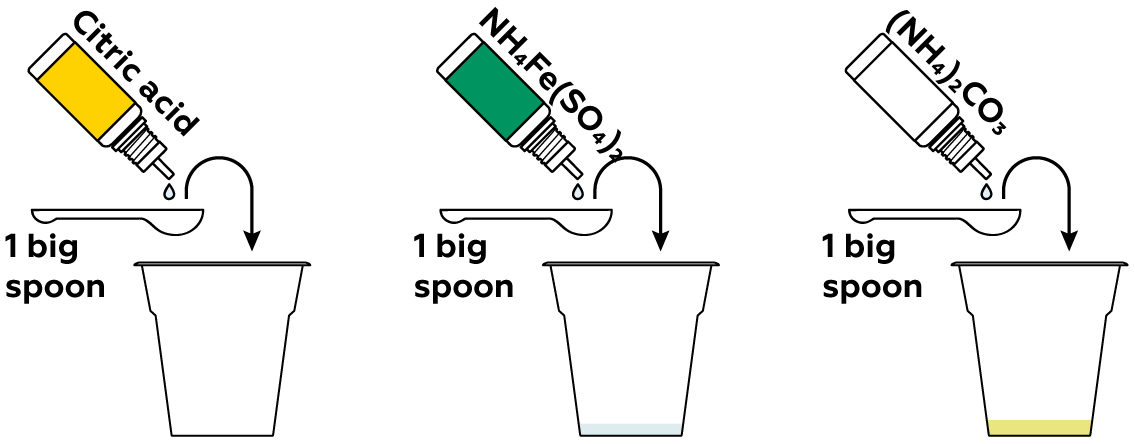
Ammonium iron(III) citrate is indeed light-sensitive; in other words, it undergoes chemical changes when exposed to light. But these changes aren't visible on their own. To make them visible, add some potassium hexacyanoferrate(III). It will form a vividly-colored compound once the ammonium iron(III) citrate is exposed to light.

Apply your light-sensitive mixture to a sheet of paper.
Set the photochemical reaction in motion using the LED. Draw slowly to create the clearest possible image—the chemical processes don’t exactly occur at light speed.
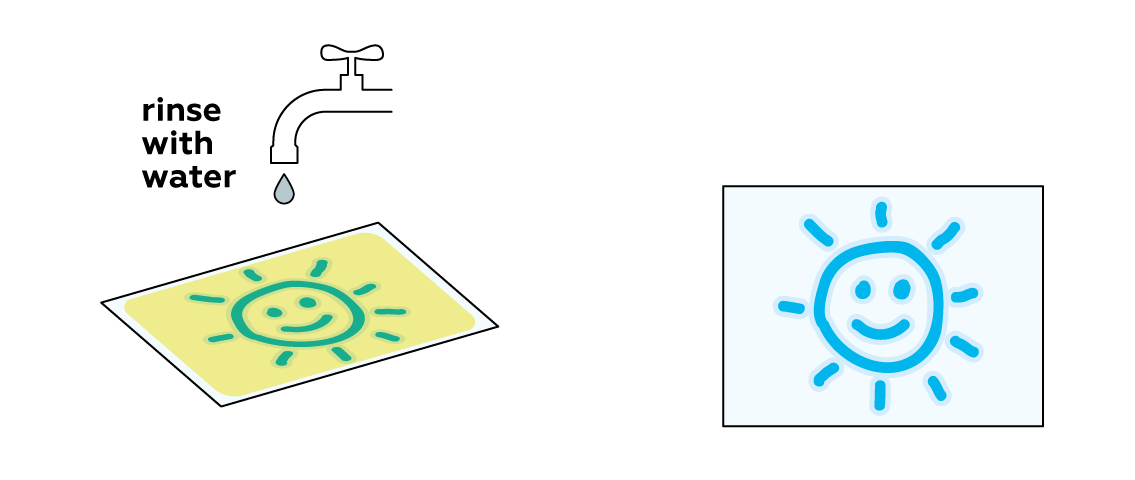
In order to preserve your image, you need to remove any unreacted light-sensitive mixture from the paper.
Disposal
Please refer to local regulations when disposing of chemicals. Dispose of other solid waste with household garbage. Pour leftover solutions down the sink. Wash with an excess of water.
Scientific description
 When light
 ![]() hits the iron ions Fe3+
hits the iron ions Fe3+  from ammonium iron(III) citrate, it initiates a reaction in which Fe3+ gains an electron
 ![]() , turning (or, as chemists say, reducing) into Fe2+
, turning (or, as chemists say, reducing) into Fe2+  . But the product of this reaction is not yet visible, and that’s where potassium hexacyanoferrate(III)
  comes into play. It doesn’t stick to Fe3+ , but once it meets Fe2+ , it forms an insoluble, intensely-colored compound
  called Prussian blue. This is what we see when we look at a cyanotype image.
 Nowadays, this technique of "drawing with light" is used mostly by hobbyists to print photos or even decorate clothes. But in the second half of the nineteenth and early twentieth centuries, it was commonly used to copy technical drawings. That’s why architectural plans and technical drawings are still often called blueprints.
What is in the photosensitive mixture?
We obtained our photosensitive mixture by combining three key components:
- iron(III) ions Fe3+ (from the ammonium iron(III) sulfate solution)
- citrate ions (from the citric acid solution)
- hexacyanoferrate ions [Fe(CN)6]3– (from the K3[Fe(CN)6] solution).
What role does light play in chemical reactions?
To start, what is light? It is a form of energy that many substances can absorb. When we talk about the energy absorbed by a substance, we mostly mean that electrons in some of said substance’s atoms receive this energy.
Therefore, electrons get excited by this “power-up” and perform something that we can call an “electron jump.” In most cases, such a jump ends with a simple emission of the excess energy back into the surrounding area in the form of heat. This is why, for example, dark-colored objects (which absorb a lot of light) heat up quickly in sunlight.
But there is another way to release that energy: the powered-up electrons can jump from one atom to another, resulting in chemical changes. In other words, the light itself initiates the chemical reaction!
Processes that are powered or chemically influenced by light are known as photochemical reactions. One of the most well-known examples of such a reaction is photosynthesis in plants – one of the building blocks of organic life on Earth.
Why does the inscription appear?
The light from the LED initiates a series of reactions. Iron(III) ions Fe3+ interact with citrate ions. They receive one electron and are reduced, transforming into iron(II) ions Fe2+, while citrate ions are oxidized:
Fe3+ + e– → Fe2+
The Fe2+ ions react with [Fe(CN)6]3– ions, yielding the dark-blue precipitate Fe4[Fe(CN)6]3, also known as Prussian blue.
Is the color of the LED important?
A red LED actually won’t work at all. A green LED will work poorly, but you’ll be able to see the drawing appear gradually. A blue LED will work nicely.
But why do their effects differ? In brief: the light they emit is a form of energy. The different color of each LED represents a different amount of energy being emitted. As it turns out, the reaction between iron(III) ions and citrate ions requires that a certain amount of energy be transferred to the reagents.
Why doesn’t the drawing wash off of the paper?
The Prussian blue obtained in the experiment isn’t soluble in water. It settles firmly on the surface of the paper, while the unreacted mixture is easily washed away.
That’s interesting!
The secrets of Prussian blue
This blue pigment has many names, including Prussian blue, Parisian blue, and Turnbull's blue. It is a mixture of ferrocyanide compounds KFe(III)[Fe(CN)6] and Fe(II)(Fe(III)[Fe(II)(CN)6]3.
After its invention, the new pigment rapidly gained popularity thanks to its vivid color, stability, and ease of use. It has many applications, from dyeing cloth to copying technical drawings (i.e. making blueprints).
Indeed, famous artists quickly began working with Prussian blue. Most notably among these are perhaps Dutch post-impressionist Vincent Van Gogh (“Starry Night,” 1889) and Japanese artist, painter and printmaker Katsushika Hokusai (“The Great Wave off Kanagawa,” 1823-31); moreover, a number of artists working in Paris in the 18th (Jean-Antoine Watteau, Nicolas Lancret, Jean-Baptiste Pater) and 19th (Julien Dupré, Edgar Degas, and others) centuries used Prussian blue in their finest paintings.
In the 19th century, tea was still an expensive product, available mostly to the wealthy. Dishonest merchants sometimes used Prussian blue to commit fraud – they dried used tea leaves, colored them with Prussian blue, re-dried them, and sold them as “fresh” tea!
In the 20th century, it was discovered that Prussian blue can somewhat mitigate radiation poisoning. It can bind with radioactive isotopes of cesium and thallium in the digestive tract and prevent their absorption. It’s still utilized in select cases even today!


