Copper coin
Make a copper copy of a real coin!


Safety
-
Put on protective gloves and eyewear.
-
Conduct the experiment on the tray.
- Do not allow chemicals to come into contact with the eyes or mouth.
- Keep young children, animals and those not wearing eye protection away from the experimental area.
- Store this experimental set out of reach of children under 12 years of age.
- Clean all equipment after use.
- Make sure that all containers are fully closed and properly stored after use.
- Ensure that all empty containers are disposed of properly.
- Do not use any equipment which has not been supplied with the set or recommended in the instructions for use.
- Do not replace foodstuffs in original container. Dispose of immediately.
- In case of eye contact: Wash out eye with plenty of water, holding eye open if necessary. Seek immediate medical advice.
- If swallowed: Wash out mouth with water, drink some fresh water. Do not induce vomiting. Seek immediate medical advice.
- In case of inhalation: Remove person to fresh air.
- In case of skin contact and burns: Wash affected area with plenty of water for at least 10 minutes.
- In case of doubt, seek medical advice without delay. Take the chemical and its container with you.
- In case of injury always seek medical advice.
- The incorrect use of chemicals can cause injury and damage to health. Only carry out those experiments which are listed in the instructions.
- This experimental set is for use only by children over 12 years.
- Because children’s abilities vary so much, even within age groups, supervising adults should exercise discretion as to which experiments are suitable and safe for them. The instructions should enable supervisors to assess any experiment to establish its suitability for a particular child.
- The supervising adult should discuss the warnings and safety information with the child or children before commencing the experiments. Particular attention should be paid to the safe handling of acids, alkalis and flammable liquids.
- The area surrounding the experiment should be kept clear of any obstructions and away from the storage of food. It should be well lit and ventilated and close to a water supply. A solid table with a heat resistant top should be provided
- Substances in non-reclosable packaging should be used up (completely) during the course of one experiment, i.e. after opening the package.
FAQ and troubleshooting
The coin leaves a poor imprint. Why?
Prior to starting the experiment, thoroughly knead the playdough with your hands to make it warmer and softer. Only after that, place the playdough into a Petri dish and push in the coin.
I couldn’t duplicate the coin. What to do?
There are few reasons why copper layer may not form on the imprint.
First of all, check the connections and their sequence in the circuit. The red crocodile clip should be connected to the red wire of the battery holder, and the black clip—to the black wire.
Then, examine whether the battery is inserted in the holder correctly. If the polarity was set correctly, then try replacing the battery with a new one.
Also, check that the copper plate touches liquid. However, make sure the crocodile clips do not touch the solution.
The duplicate of the coin turned out black. How to make it shiny?
The resulting copy may turn out black if there were traces of graphite. To make the coin shiny, rub it with an abrasive—sandpaper, steel wool or sand.
The duplicate coin turned out too thin and broke into pieces. What to do?
If the coin turned out fragile and fell into pieces, it means that at some point the circuit has been broken: electrical current stopped, and the coin couldn’t develop completely.
Repeat the experiment. Check all the connections and change the battery, just in case.
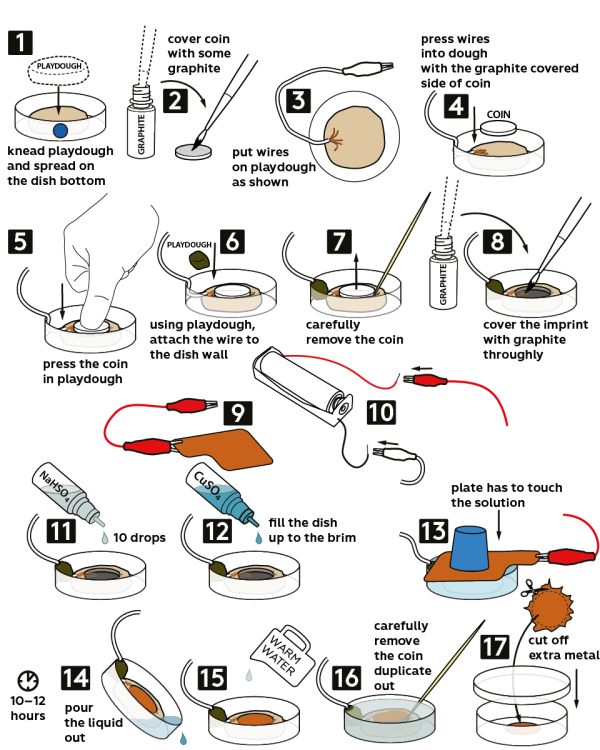
Step-by-step instructions
-
Take a piece of light-colored playdough and knead it well. Now, flatten the playdough evenly spreading it on the bottom of a Petri dish.
-
Dip the brush in graphite and cover a coin, which you would like to reproduce, with graphite.
-
Place loose ends of the wire into playdough, closer to an edge.
-
Press the ends of the wire into playdough with a graphite-coated side of the coin.
-
Tightly press the coin into playdough.
-
Now, take a piece of dark-colored playdough and knead it well. With playdough, press the wire against the Petri dish wall, but avoid touching the coin.
-
Carefully remove the coin using a toothpick.
-
Thoroughly cover the coin print with graphite.
-
Fix a red crocodile clip onto a “tab” of a copper plate.
-
Connect the loose ends of the crocodile clips to a battery holder: the black clip to the black wire, and the red clip to the red one. Now, insert 1 AAA battery into the battery holder.
-
Add 10 drops of 3M sodium hydrosulfate NaHSO4 solution into the Petri dish.
-
Now, fill the Petri dish to the brim with 0.4M copper sulfate CuSO4 solution.
-
Place the copper plate on the Petri dish so that it touched the solution. Secure the copper plate in place with the rubber stopper from the Starter kit and leave it for 10–12 hours.
-
Pour out the liquid from the Petri dish.
-
Cover the playdough with warm water.
-
Carefully remove the copy of a coin using a toothpick.
-
Cut off excess of material on the edges of the coin. Keep the the coin in a petri dish.
Disposal
Dispose of solid waste together with household garbage. Pour solutions down the sink. Wash with an excess of water.
Scientific description
How is a copy of the coin obtained?
With electrical current, copper metal (Cu) from the aqueous solution of copper sulfate (CuSO4) precipitates out on the graphite layer. Copper evenly deposits onto the playdough covered with graphite, thus, forming a new coin.
So, why does our “duplicate” preserve the shape of the coin imprint? Growing layer by layer, copper repeats the imprint shape in playdough and forms a structure, which is firm enough, so that we can carefully remove it and keep as a souvenir.
How does copper end up on graphite, and why does it appear exactly there?
In water, copper sulfate dissociates, or decomposes into ions:
CuSO4 ↔ Cu2+ + SO42–
Normally, copper sulfate completely dissociates in water, and only separate ions can be found in the solution.
In the electrical circuit, graphite is connected to the negative terminal of the battery. This negative terminal attracts positively charged particles from the solutionin particular, Cu2+ copper ions.
Once on graphite, each of these ions is reduced by accepting two electrons and thus turning into a neutral copper atom:
Cu2+ + 2e– → Cu0↓
This transformation is possible because graphite, similarly to metals, conducts electricity and with electrical current gains an excess of electrons.
These electrons pass onto copper ions, turning them into atoms that gradually coat the graphite.
Obviously, if there is an excess of electrons somewhere in the system, somewhere else we should expect an electron deficiency. Here, the copper plate is deprived of electrons.
An inverse process occurs on the plate: every copper atom that loses a pair of electrons turns into a Cu2+ copper ion, which moves into the solution:
Cu0 – 2e– → Cu2+
Interestingly, with both of these processes occurring simultaneously, the concentration of copper sulfate, which is a quantity of particles of this compound per entire solution volume, stays constant.
Why do we have to wait for so long?
The coin is formed because of electrical current. In this experiment, we use only one battery. But why can’t we take two or even four batteries, and thus increase the amperage and speed up the experiment?
In fact, the slower the coin grows (in case of a low amperage), the flatter, more accurate, and thinner the copper layers turns out. Gradually, many layers grow on top of each other, making the coin firm. However, if we try to grow the coin quicker (with a high amperage), the copper layers will deposit randomly and loosely. And the coin will turn out porous and fragile, so that it would be impossible even to remove it from playdough.
What is sodium hydrosulfate (NaHSO4) used for in the experiment?
Prior to filling the Petri dish with the blue solution of copper sulfate, we added there a little bit of sodium hydrosulfate aqueous solution. Similarly to copper sulfate, it completely dissociates into ions in water:
NaHSO4 → Na+ + HSO4–
HSO4– ↔ H+ + SO42–
When H+ hydrogen ions are present in the solution, they make it acidic. And copper oxide CuO, which does not allow the copper plate to participate in the reaction by donating Cu2+ copper ions, is removed from the plate surface thanks to the acidic solution:
CuO + 2H+ → Cu2+ + H2O
By cleaning the plate we create conditions for an effective reaction.
Apart from that, sodium hydrosulfate significantly increases electric conductivity of the solution, which becomes crucial in an experiment with only one battery. Such an effect is due to unique properties of H+ hydrogen ions. Their mobility in aqueous solutions is much higher than mobility of other positively charged ions.
What else can be “grown” in this experiment?
The experiment isn’t limited to just a coin imprint. Leave a fingerprint or a leaflet imprint, for instance. For the latter, though, playdough should be warmed and softened beforehand. Then, a fragile leaflet will not break or crumble in the playdough. All the other steps should be repeated in the same sequence as in the case with the coin. Thus, it is possible to capture your fingerprint in copper or even create a copper copy of a real leaflet (see the video below)!
That’s interesting!
What metals are coins made of?
Coins are usually small metal discs, which from the ancient times have been used as trade exchange items, or cash. The choice of material for coins is not a coincidence. First, coins should be easy to manufacture in large quantities, while keeping a uniform shape and mass. Ductile metals satisfy this requirement, whereas other materials, such as wood or stone, do not fit for these purposes. Second, a number of metals are air- and moisture-resistant, so that coins can be used or stored for a long time (recall numerous stories about buried ancient treasures and sunken chests). Third, and that is just how people perceive things, we are always attracted to shiny objects, whether it is a steel blade, a golden coin, a pearl or a diamond.
For a long time, the main materials for coins were the three metals—gold, silver, and copper. Copper was normally alloyed with tin and lead—to produce bronze. With development of chemistry and metallurgy, they also started to use zinc, nickel, aluminum, iron, and other non-precious metals. Moreover, these metals were alloyed with copper to produce so-called bronze (approximately 90% copper and 10% tin), brass (about 60% copper and 40% zinc), aluminum bronze (around 90% copper and 10% aluminum), and melchior, or German silver (about 75% copper and 25% nickel). Here is how the coins are made today and what they are made of.
Interestingly, back then they mainly used coins, not banknotes, as currency. Since coins were made of precious metals, they also served as a state treasury in many countries. However, from the beginning of 20th century, they reduced the use of gold and silver in coins to nothing. Today, such coins can only be antique, exhibit or keepsake items, but not currency.


