Concentration cell
Learn how a concentration cell works


Safety
-
Put on protective gloves and eyewear.
-
Conduct the experiment on the tray.
- Do not allow chemicals to come into contact with the eyes or mouth.
- Keep young children, animals and those not wearing eye protection away from the experimental area.
- Store this experimental set out of reach of children under 12 years of age.
- Clean all equipment after use.
- Make sure that all containers are fully closed and properly stored after use.
- Ensure that all empty containers are disposed of properly.
- Do not use any equipment which has not been supplied with the set or recommended in the instructions for use.
- Do not replace foodstuffs in original container. Dispose of immediately.
- In case of eye contact: Wash out eye with plenty of water, holding eye open if necessary. Seek immediate medical advice.
- If swallowed: Wash out mouth with water, drink some fresh water. Do not induce vomiting. Seek immediate medical advice.
- In case of inhalation: Remove person to fresh air.
- In case of skin contact and burns: Wash affected area with plenty of water for at least 10 minutes.
- In case of doubt, seek medical advice without delay. Take the chemical and its container with you.
- In case of injury always seek medical advice.
- The incorrect use of chemicals can cause injury and damage to health. Only carry out those experiments which are listed in the instructions.
- This experimental set is for use only by children over 12 years.
- Because children’s abilities vary so much, even within age groups, supervising adults should exercise discretion as to which experiments are suitable and safe for them. The instructions should enable supervisors to assess any experiment to establish its suitability for a particular child.
- The supervising adult should discuss the warnings and safety information with the child or children before commencing the experiments. Particular attention should be paid to the safe handling of acids, alkalis and flammable liquids.
- The area surrounding the experiment should be kept clear of any obstructions and away from the storage of food. It should be well lit and ventilated and close to a water supply. A solid table with a heat resistant top should be provided
- Substances in non-reclosable packaging should be used up (completely) during the course of one experiment, i.e. after opening the package.
FAQ and troubleshooting
The galvanometer pointer hasn’t moved after step 9. What to do?
There are several ways to make the pointer move along the scale.
-
Disconnect one crocodile clip from the galvanometer and reconnect it again. Keep watching the pointer - it will move very slightly.
-
Try reconnecting the galvanometer, but swap the red and black crocodile clips.
-
Check the connection between the crocodile clips, the zinc wire, and the copper plates. Rods and plates must be secured on the edge of the test tube.
-
Make sure that colorless zinc sulfate ZnSO4 solution is in the test tubes with the zinc wire, and blue copper sulfate CuSO4 solution is in the test tubes with copper plates. The plates must be partially immersed in the corresponding solutions.
The galvanometer pointer hasn’t moved after step 10. How to fix that?
Add 1 more drop of ammonia NH3 solution to sodium sulfate Na2SO4 solution.
If it didn’t help, check the wiring (follow the steps listed in the previous question).
Step-by-step instructions
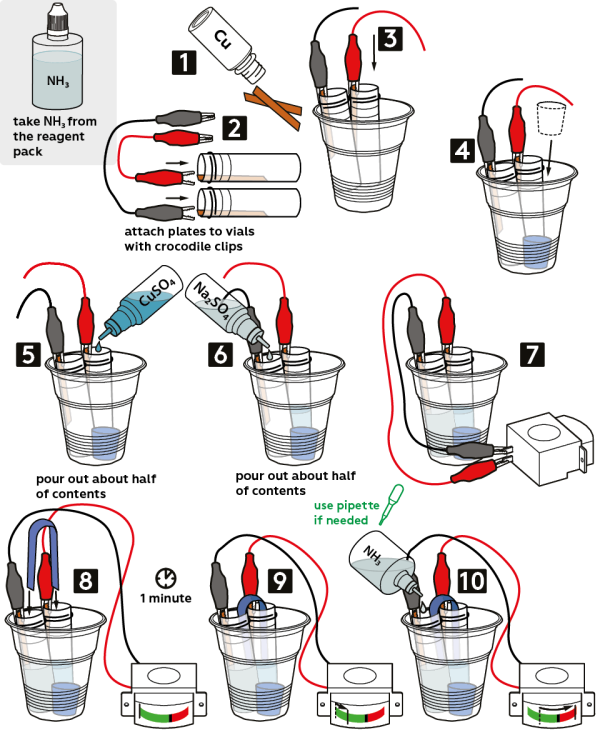
- Take 2 copper plates from the vial marked “Cu.”
- Take 2 crocodile clips: 1 black and 1 red. Using crocodile clips, fix the copper plates onto the walls of plastic test tubes.
- Place the test tubes into a plastic cup.
- Place a rubber stopper onto the bottom of the cup to stabilize it.
- Pour about half a vial of 1M copper sulfate CuSO4 solution (10 mL) into the test tube with the red clip on it.
- Pour half a vial of 0.1M sodium sulfate Na2SO4 solution (10 mL) into the second test tube (the one with the black clip on it).
- Connect the crocodile clips to a galvanometer.
- Take a stripe of well-absorbing towel and bend it in half.
- Dip the ends of the towel into both test tubes. Wait for 1 minute to let the towel soak in the solutions.
- The galvanometer indicator needle will slightly deflect from a zero position. Add 1 drop of 2M ammonia NH3 solution to sodium sulfate Na2SO4 (the test tube with the black clip)—and the indicator needle will instantly swing towards the maximum of the scale!
Disposal
Dispose of solid waste together with household garbage. Pour solutions down the sink. Wash with excess of water.
That’s interesting!
What is galvanometer, and what is it used for?
Electricity is an organized flow of charged particles. In order to characterize its quantity, scientists introduced the term “current.” Current is determined as a total charge passing through a wire per unit of time. The more charges pass through per second, the higher the current. Weak currents are normally safe for people.
In our experiment, we use a special device to detect the current—a galvanometer (from the Italian galvano, originating from the name of a researcher Luigi Galvani, and the Greek metreo, meaning “to measure”). Compared to a regular amperemeter (from the French ampère, in honor of a scientist André-Marie Ampère, and the Greek metreo), a galvanometer features a very high sensitivity: it would detect and indicate even a very weak current.
To understand the working principle of a galvanometer, we need to dig into the nature of electricity. As a matter of fact, electrical current passing through a conducting material creates a magnetic field around.
Now, what is this field? Essentially, it is a way to describe how an object or matter, depending on its properties, affects surrounding it objects. For example, we are constantly under the action of gravity force of our planet, Earth. In order to describe an attraction of any object to Earth, they use a term “gravitational field.” It acts on any (absolutely any!) body that has a mass.
The situation is very similar with a magnetic field: it acts on any object that can be magnetized. Experimentally, this property of an object may be probed with a permanent magnet. Magnetic field propagation around a magnet can be illustrated with an interesting test. A magnet is placed under a sheet of paper covered with iron filings. Almost instantly, these iron filings align into certain structures, among which one can easily distinguish an outline of the magnet itself.
Another demonstration of magnetism is the way magnets act on each other. Magnets naturally align opposite to each other. This property was used to invent a compass. Besides a gravitational field, our Earth has a magnetic field, i.e. it acts as a gigantic magnet. A small long-shaped magnet suspended on a long rope would “feel” the Earth’s magnetic field and align along it. And this principle is employed in a compass.
Getting back to the topic, electricity and magnetism are closely interconnected. A magnetic field is created by an organized flow of charges, i.e. electricity. And this is exactly how an electromagnet works. In fact, an electromagnet is essentially a magnetizable core coiled many times around with a wire. Upon electrical current flow through this wire, the core becomes magnetized. Since power of permanent magnets is very limited, electromagnets play a huge role in modern science and technology.
The same principle is employed in a galvanometer. Its needle is fixed on a coil, which in turn is connected to contacts of a galvanometer. Its zero position is set with a tiny spring, and the coil is kept in a field of a constant magnet. Thus, when current flows through the coil, the latter turns into a magnet itself. Now, two magnets interact with each other, and that causes displacement of the needle. Importantly, the higher the current through the coil, the stronger the magnetic field created by it. Consequently, the higher the current, the stronger the needle displacement.
Since in our experiment we deal with weak currents, a galvanometer would be the most suitable tool for the job.


